5.6 Manage agencies
Agency details are managed using four workflows in the People category:
-
Add Group
-
Amend Group
-
Remove Group
-
Edit Groups
Note: If you make changes to an agency, the information held within the records of people added before the change was made will not contain the new details. It is important to carefully consider your agency structure and details, as you will either have to manually edit the appropriate people’s records or write an SQL script to update them.
Agencies are used to hold groups of individuals and form the hierarchy of agencies within MyID. Information recorded about agencies forms part of the unique identification number written to a card and so must be created before people can be added to MyID.
5.6.1 Add agencies
-
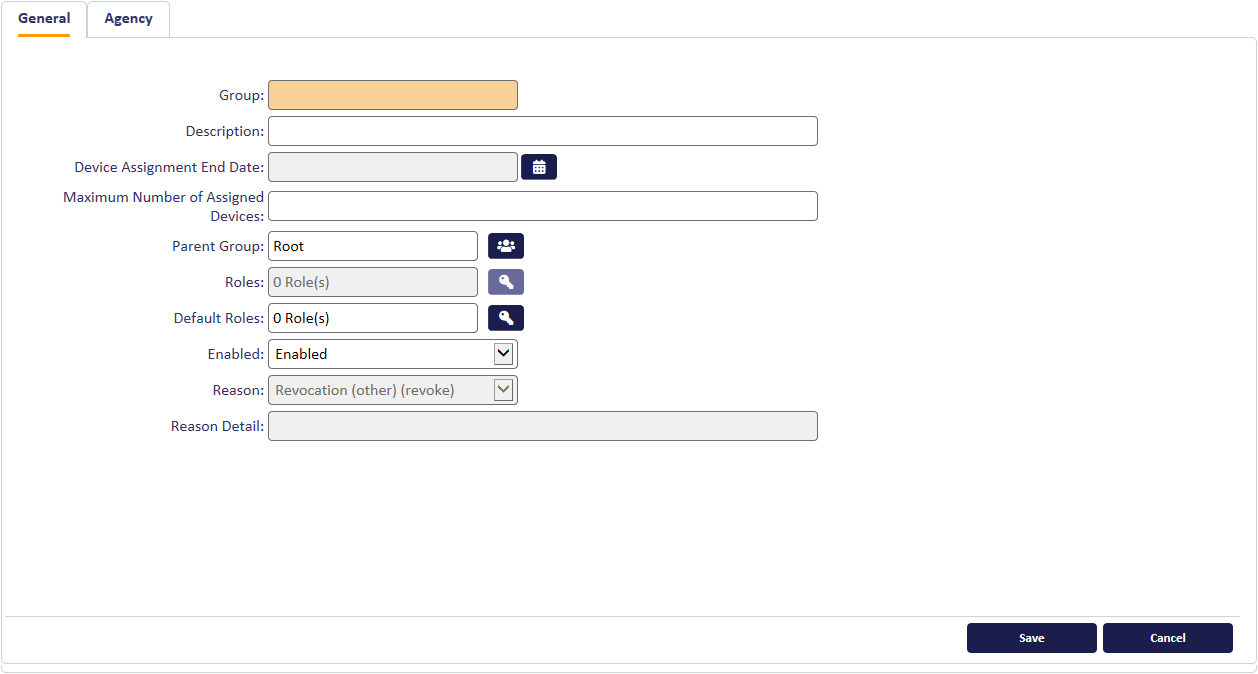
From the People category, select Add Group.

- In Group, type the name of the agency.
- Enter a short Description for the agency.
-
Optionally, set the following license options:
-
Device Assignment End Date – select the last date on which you can assign or issue devices for this group. After this date, you will no longer be able to assign or issue devices to people in this group.
-
Maximum Number of Assigned Devices – type the maximum number of devices you can assign or issue to this group. Once the number of devices assigned or issued to people in this group reaches this number, you will no longer be able to assign or issue devices to people in this group.
-
-
Click the icon to the right of Parent Group. A list of available parent agencies is displayed.
-
If you are entering details of your top-level agency, select Root. The only other options available at this time are MasterAdmin and System Startup, which contains the startup users.
-
If you have already created other agencies, select the one to contain the new agency you are creating.
-
-
Click the icon to the right of Roles and select the roles that can be placed in this agency from the list displayed.
Click OK. The number of roles that you have selected is displayed in the Roles box.
Note: If you do not select any roles, and leave the option displaying 0 Role(s), this means that the agency is unrestricted and all roles are available to the agency.
-
By default, a new agency is Enabled.
If you set this agency to Disabled, you can specify a reason. A “no entry” sign is displayed against the agency when you view it in the Parent Group list.
-
Click the Agency tab.
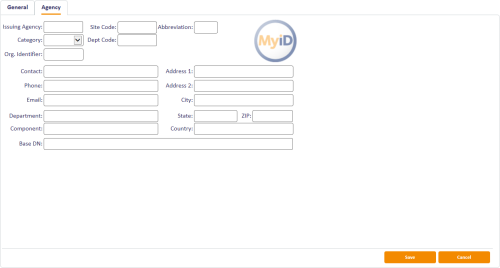
-
In Issuing Agency, enter the standard four-character code for the agency issuing the credential.
For PIV-I and CIV cards, enter 9999.
-
Enter the standard Site Code.
For PIV-I and CIV cards, enter 9999.
- Type the Abbreviation for the agency to appear on the printed card.
- Select the correct Category from the list available (Federal, State, Commercial or Foreign).
-
Enter the Dept Code, if you have one.
Note: To ensure that PIV electronic personalization and physical card printing match, set this to six digits, front padded with zeros; for example, 000123.
-
Type an Org. Identifier for the agency. This is the ID code of the applicant’s organization. The value depends on the Category you specified:
- Federal – The agency code (as recorded in Agency Code).
- State – The state code.
- Commercial – The code for the company.
- Foreign – The numeric country code.
- Click the image to upload an image of the agency's seal.
- If you select Commercial as the Category, enter the Agency DUNS code in the DUNS field.
- Enter Contact information (including the name, Address, Phone number and Email address) for an individual who can answer questions relating to this agency.
- The Department field defaults to the name of the ParentGroup as defined in the General tab. You can change this value if necessary.
- In the Component field, type the component within the agency. This field is optional.
-
Enter the Base DN.
This value is appended to the individual’s common name to form the DN of every person added to this agency.
For example: c=us, o=agency, ou=agency.

Warning: MyID does not validate the information you enter here. Enter the information in comma-separated LDAP format and carefully check the information. An incorrect entry could prevent the issue of cards and certificates to people in this agency.
5.6.1.1 Escaping characters in the base DN
MyID assumes that the base DN is correctly escaped; if it is not, any people in that agency will have invalid DNs. To correct this, you must remove the person, correct the agency base DN, then add the person again.
The characters that you must escape are:
, = + < > \ # ; "
To use any of these characters, you must enclose them in double quotes. Additionally, you must prefix any " (double quote) or \ (slash) character with a \ (slash).
For example:
John Smith, Jnr
should be escaped as
cn="John Smith, Jnr", o=...
If you have an o value of:
Smith "Budget" Cars
this should be escaped as:
o="Smith \"Budget\" Cars", c=...
You can now issue cards following the PIV process.
5.6.2 Amend agencies
- Click the People category and select the Amend Group workflow from the list.
-
Select the agency you want to change from the list and click Continue.
If you have selected the wrong agency, click the icon to the right of Select a Group to display the list of agencies again.
- Information entered when the agency was added can be amended. For further information, see section 5.6.1, Add agencies.
Note: If you disable an agency, all user accounts within that agency are disabled.
5.6.3 Remove agencies
- Click the People category and select the Remove Group workflow from the list.
-
Select the agency you want to change from the list.
If you have selected the wrong agency, click the Agency icon to the right of Select an Agency to display the list of agencies again.
- Click Continue.
- Click Remove.
Note: You cannot remove an agency that contains other entries. Instead, you must use the Edit Groups workflow where you will be prompted for a new location for the agency’s contents.
5.6.4 Edit agencies
Using the Edit Groups option, you can add, rename, edit and remove agencies and import an LDAP directory branch into your agency structure.
-
From the People category, click Edit Groups.
Existing agencies are displayed in a tree structure:
-
Click the plus sign to the left of an agency name to view the agencies nested within it.
-
Click the minus sign to the left of an agency name to collapse the view, hiding any agencies nested within it.
-
Click the name of an agency to select it.
-
-
Right-click the name of a selected agency to display a menu. From here you can:
-
Add a new agency
-
Move an agency to a new location in the tree structure
-
Rename an agency
-
Import an LDAP branch, choosing whether to:
-
Import an OU and its children
-
Import just the children of an OU
-
-
Remove an agency, choosing whether to:
-
Remove an agency, moving any agencies it contains and the users to a new agency
-
Remove the agency and any agencies it contains, moving only the users to a new agency
-
-
- When you have made all the necessary changes, click Save.
5.6.4.1 Add a new agency
- Right-click the name of the agency that you want to contain the new agency.
-
Select Add, then New Group from the menu.
A new agency is created, called New.
If the parent agency is closed, you may not see the new agency. Click the + sign next to the parent agency to view it.
- Right-click the name of the agency and select Rename Group from the menu.
- Select the existing name of the agency and enter a new one.
- Click Save.
5.6.4.2 Move an agency
- Right-click the name of the agency that you want to move.
- Select Move Group from the menu.
- Click the name of the agency that you want to contain it.
- Click Save.
5.6.4.3 Rename an agency
- Right-click the name of the agency that you want to rename.
- Select Rename Group from the menu.
- Highlight the existing name of the agency and enter a new name.
- Click Save.
5.6.4.4 Import an LDAP branch
- Right-click the name of the agency into which you want to import a branch from an LDAP directory.
- Select Import LDAP Branch from the menu.
-
Select either:
-
OU and Children to import the agency and all its contents
-
Just Children to import just the contents of the agency
-
-
The Select Agency dialog is displayed.

Locate and select the Organizational Unit (OU) that you want to import and click Select.
- Click Save.

5.6.4.5 Remove an agency
- Right-click the name of the agency you want to remove.
- Select Remove Group from the menu.
-
Select either:
-
Remove Group, Move Sub-Groups and Users to delete the agency but move any sub-agencies and people to another agency.
-
Remove Group and Sub-Groups, Move Users to delete the agency and any sub-agencies within it but move the people to another agency.
-
- A message is displayed asking you to confirm that you want to delete the agency. Click Yes to continue.
-
The Reparent Users dialog is displayed.
Click the name of the agency into which you want to move any sub-agencies and people, then click Select.
- Click Save.